-
Step 1: Gather Your Supplies
Make sure you have all the necessary supplies ready, including your vape tank, a new coil, your preferred e-liquid, and a paper towel or tissue.
-
Step 2: Unscrew the Tank
Detach the tank from your vaping device by unscrewing it from the mod or battery.
-
Step 3: Access the Coil
Once the tank is separated, you'll see the coil assembly inside. The coil is the part responsible for heating and vaporizing the e-liquid.
-
Step 4: Remove the Old Coil
If you're replacing an old coil, carefully unscrew the old one from the base of the tank. Be sure to dispose of it properly.
-
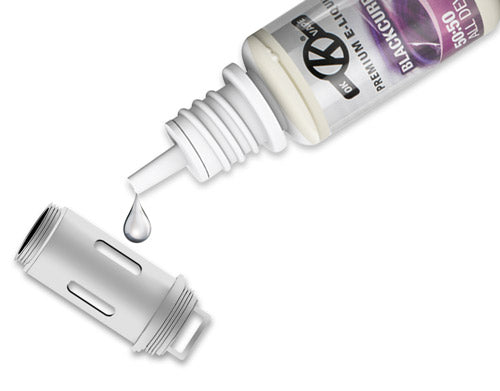
Step 5: Prepare the New Coil
Take the new coil and apply a few drops of e-liquid onto the exposed cotton wicking material on the sides of the coil. This helps to saturate the wick and prevent dry hits.
-
Step 6: Install the New Coil
Screw the newly primed coil into the base of the tank securely, but don't overtighten it.
-
Step 7: Fill the Tank
Now, fill your tank with your chosen e-liquid, ensuring not to overfill it. Leave a small gap at the top to allow for expansion.
-
Step 8: Reassemble the Tank
Carefully reattach the tank to your vaping device by screwing it back onto the mod or battery.
-
Step 9: Let It Sit
Allow the tank to sit for a few minutes, ideally 5-10 minutes. This gives the e-liquid time to fully saturate the coil's wick.
-
Step 10: Test Fire
Before taking your first puff, fire the vape without inhaling (usually by pressing the fire button). This helps ensure the coil is properly primed, and you won't experience any dry hits.
-
Step 11: Start Vaping
Now you're ready to start vaping. Begin with lower wattage settings and gradually increase to your desired level for the best flavor and vapor production.
So, by the end of these steps, your old coil will have been replaced with a new one, and the new coil will be properly primed, ready for vaping.